Description:
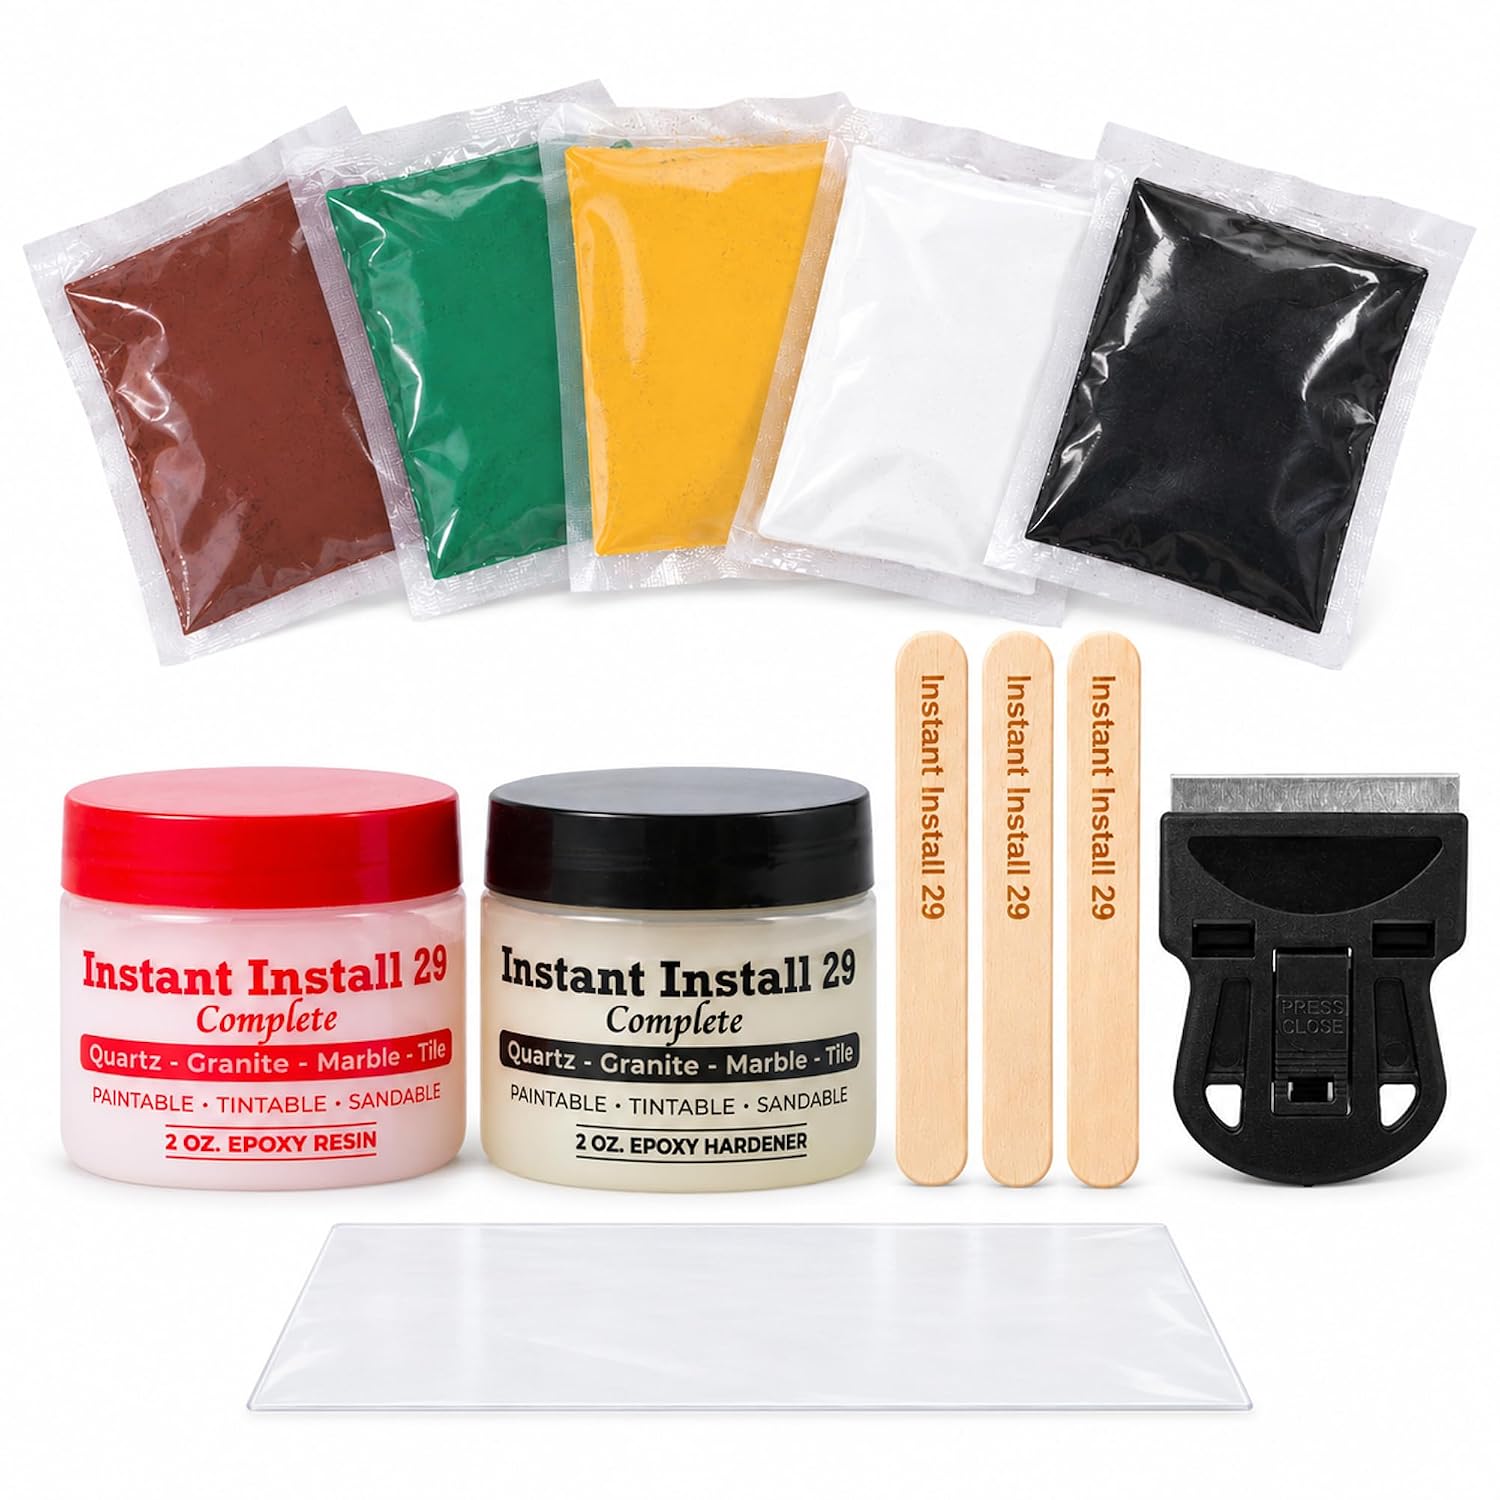
What's in the box
Details:
| Brand | Epox-Sci |
|---|---|
| Specific Uses For Product | Broken Stone Bonding, Chip and Crack Filling, Countertop Repair, Countertop Seam Bonding, Edge and Corner Rebuilding |
| Material | Epoxy Resin |
| Item Form | Paste |
| Special Feature | Gap Filling, Shapeable Before Setting, Tintable, Trimmable After Setting, Two-Part Formula |
Visit the Epox-Sci Store
Epox-Sci Instant Install 29 Granite Epoxy Repair Kit, 4 oz, With Tint
QAR15837
Quantity:
Order today to get by 7-14 business days
Delivery fee of QAR 20. Free for orders above QAR 200.
 Imported From: United States
At BOLO, we work hard to ensure the products you receive are new, genuine, and sourced from reputable suppliers.
Every product in the BOLO catalogue is sourced through our Verified Global Supply Network of verified sellers, authorized distributors or directly from the manufacturer.
Each product undergoes thorough inspection and verification at our consolidation and fulfilment centers to ensure it meets our strict authenticity and quality standards before being shipped and delivered to you.
If you ever have concerns regarding the authenticity of a product purchased from us, please contact Bolo Support. We will review your inquiry promptly and, if necessary, provide documentation verifying authenticity or offer a suitable resolution.
Your trust is our top priority, and we are committed to maintaining transparency and integrity in every transaction.
While we strive to display accurate information, variations in packaging, labeling, instructions, or formulation may occasionally occur due to regional differences or supplier updates. For detailed or manufacturer-specific information, please contact the brand directly or reach out to BOLO Support for assistance.
Unless otherwise stated, all prices displayed on the product page include applicable taxes and import duties.
BOLO operates in accordance with the laws and regulations of Qatar. Any items found to be restricted or prohibited for sale within the Qatar will be cancelled prior to shipment. We take proactive measures to ensure that only products permitted for sale in Qatar are listed on our website.
All items are shipped by air, and any products classified as “Dangerous Goods (DG)” under IATA regulations will be removed from the order and cancelled.
All orders are processed manually, and we make every effort to process them promptly once confirmed. Products cancelled due to the above reasons will be permanently removed from listings across the website.

About Instant Install 29 and EZ-Tint
Instant Install 29
- Offers lifelong, permanent repair durability that will never wear off or wash away.
- 100% safe for contact with surfaces that may encounter food (e.g., kitchen countertops).
- Easy to use for do-it-yourself (DIY) homeowners or professionals.
EZ-Tint
- Black, brown, green, white, & yellow are the five primary colors found in stone.
- Easy color matching.
- Superior to liquid tints which frequently migrate out of repairs, especially where food and water are present.
- Never leaches out of repairs.
- Highly concentrated - a little tints a lot.

Intended Uses
- Countertop installation
- Cracks
- Gouges
- Pits
- Reattaching/rebuilding missing stone

Repair-Specific Instructions
Note: For more detailed instructions, please see the "Instructions for Use" module below.
- Chipped Stone: No tint is needed if you have a clean break. Apply the epoxy to one side & push the stone firmly into place. Clamp the stone or use duct tape for a tight hold while drying & for less visible seams.
- Countertop Installation: No joint line taping is needed as the dried epoxy does not stick to smooth surfaces. Mix equal parts resin & hardener & apply the epoxy to one or both edges of the stone. Clamp the stone for maximum bond strength. Let the epoxy cure & then razor off the excess in approximately 30 minutes once the epoxy is dry to the touch.
- Cracks: The width of the crack must be at least as wide as a credit card for the epoxy to be able to fill it. Tint the epoxy & fill the crack to the surface. Allow the epoxy to self-level for a glossy finish. For a matte or travertine type finish, razor the dried surface.
- Rebuilding Missing Chips: Tint & fill chip the with epoxy, shape the epoxy into place, let it dry, & razor off the excess.

Benefits & Features
- Can be used as an adhesive for countertop installation.
- Can be used with any natural or man-made stones (e.g., granite, marble, quartz, tile).
- Do-it-yourself (DIY) friendly with professional results.
- Fixes cracks & chips.
- Forgiving 15 minute workable time.
- Non-toxic/food-safe formula.
- Permanent bond.
- Quick 14-minute drying time.
- Quick-set epoxy.
- Tintable with EZ-Tint for easy color matching.
- Two part epoxy - resin & hardener.

Instructions for Use

Rebuilding Missing Chips
Note: Reattaching broken pieces rarely requires tinting unless some pieces are missing.
- Remove the protective film that forms over the hardener. Dip out equal amounts of resin & hardener using individual dipping sticks.
- Mix the resin & hardener together thoroughly on a flat surface (e.g., paper plate).
- If needed, add in small amounts of EZ-Tint to the mixed epoxy until the desired color is achieved.
- Fill the chip. Try not to overfill it.
- On profiled edges or vertical repairs, tape down the shaping strip over the epoxy.
- Allow 30 to 45 minutes for the epoxy to dry.
- Slowly peel back the shaping strip.
- Make sure the epoxy is dry to the touch & razor off the dried excess. The epoxy will not stick to smooth surfaces.
- Instant Install 29 will cure to a glossy finish. For a matte or travertine type finish, razor the dried surface.

Repairing Horizontal or Vertical Cracks
Note: The epoxy may need to be forced into finer cracks using a plastic putty knife.
- Remove the protective film that forms over the hardener. Dip out equal amounts of resin & hardener using individual dipping sticks.
- Mix the resin & hardener together thoroughly on a flat surface (e.g., paper plate).
- Add in small amounts of EZ-Tint to the mixed epoxy until the desired color is achieved. Use a plastic putty knife for large cracks. Try not to overfill the crack.
- On vertical cracks (e.g., walls), tape down the shaping strip over the epoxy. Using the shaping strip on flat or horizontal cracks is optional as the epoxy will self-level.
- Allow 30 to 45 minutes for the epoxy to dry.
- Slowly peel back the shaping strip.
- Make sure the epoxy is dry to the touch & razor off the dried excess. The epoxy will not stick to smooth surfaces.
- Instant Install 29 will cure to a glossy finish. For a matte or travertine type finish, razor the dried surface.

Countertop Installation
Note: No joint line taping is needed as the dried epoxy does not stick to smooth surfaces.
- Remove the protective film that forms over the hardener.
- Dip out equal amounts of resin & hardener using individual dipping sticks.
- Mix the resin & hardener together thoroughly on a flat surface (e.g., paper plate).
- If needed, add in small amounts of EZ-Tint to the mixed epoxy until the desired color is achieved. If the joint lines will be tight, tinting is not necessary.
- Apply epoxy to one or both edge(s).
- Clamp the stone tightly for maximum bond strength.
- Allow 30 to 45 minutes for the epoxy to dry.
- Make sure the epoxy is dry to the touch & razor off the dried excess. The epoxy will not stick to smooth surfaces.
- Instant Install 29 will cure to a glossy finish. For a matte or travertine type finish, razor the dried surface.
Mixing & Tinting Instructions

Step 1
Measure out & mix equal portions of resin & hardener.
Note: Tinting is optional. However, if the epoxy will be visible, tinting is required, as the tint masks any yellowing or other discoloration that may occur over time.

Step 2
Slowly add in tint to the mixed epoxy.
Note: If using white tint, use equal parts resin, hardener, & tint to prevent any future yellowing or discoloration. For darker colors, less tint is needed.

Step 3
Add tint until desired color is reached.
Note: Black or white tint can be added to darken or lighten the shade of the epoxy. As can be seen in the chip repair video on this product page, small specks of tint can also be added in after the epoxy is applied to your repair to create multiple colors & striations that are often found in stone.

Step 4
Razor away the dried excess epoxy. Razoring the cured surface will matte the finish if desired. If a glossy surface is desired, take care not to scrape the surface with the razor
Note: Your purchase includes a 2" x 4" clear shaping strip. Using the shaping strip is optional on flat surface repairs. On vertical surfaces, the shaping strip helps to keep the epoxy in place. On profiled edges like countertops, the shaping strip shapes the epoxy to the exact profile. Just use painter’s tape to tape the shaping strip down & keep it in place. In approximately 20 minutes, lift one edge of the shaping strip and ensure the epoxy is dry to the touch. Once the epoxy has dried, the shaping strip will not stick to it & peels away easily.
Similar suggestions by Bolo
More from this brand
Similar items from “Tile Epoxy Adhesives”
Share with
Or share with link
https://www.bolo.qa/products/UO0Q9CWFAJK
Visit the Epox-Sci Store
Epox-Sci Instant Install 29 Granite Epoxy Repair Kit, 4 oz, With Tint
QAR15837
Quantity:
Order today to get by 7-14 business days
Delivery fee of QAR 20. Free for orders above QAR 200.
Imported From: United States
At BOLO, we work hard to ensure the products you receive are new, genuine, and sourced from reputable suppliers.
Every product in the BOLO catalogue is sourced through our Verified Global Supply Network of verified sellers, authorized distributors or directly from the manufacturer.
Each product undergoes thorough inspection and verification at our consolidation and fulfilment centers to ensure it meets our strict authenticity and quality standards before being shipped and delivered to you.
If you ever have concerns regarding the authenticity of a product purchased from us, please contact Bolo Support. We will review your inquiry promptly and, if necessary, provide documentation verifying authenticity or offer a suitable resolution.
Your trust is our top priority, and we are committed to maintaining transparency and integrity in every transaction.
While we strive to display accurate information, variations in packaging, labeling, instructions, or formulation may occasionally occur due to regional differences or supplier updates. For detailed or manufacturer-specific information, please contact the brand directly or reach out to BOLO Support for assistance.
Unless otherwise stated, all prices displayed on the product page include applicable taxes and import duties.
BOLO operates in accordance with the laws and regulations of Qatar. Any items found to be restricted or prohibited for sale within the Qatar will be cancelled prior to shipment. We take proactive measures to ensure that only products permitted for sale in Qatar are listed on our website.
All items are shipped by air, and any products classified as “Dangerous Goods (DG)” under IATA regulations will be removed from the order and cancelled.
All orders are processed manually, and we make every effort to process them promptly once confirmed. Products cancelled due to the above reasons will be permanently removed from listings across the website.
Description:
What's in the box
Details:
| Brand | Epox-Sci |
|---|---|
| Specific Uses For Product | Broken Stone Bonding, Chip and Crack Filling, Countertop Repair, Countertop Seam Bonding, Edge and Corner Rebuilding |
| Material | Epoxy Resin |
| Item Form | Paste |
| Special Feature | Gap Filling, Shapeable Before Setting, Tintable, Trimmable After Setting, Two-Part Formula |
About Instant Install 29 and EZ-Tint
Instant Install 29
- Offers lifelong, permanent repair durability that will never wear off or wash away.
- 100% safe for contact with surfaces that may encounter food (e.g., kitchen countertops).
- Easy to use for do-it-yourself (DIY) homeowners or professionals.
EZ-Tint
- Black, brown, green, white, & yellow are the five primary colors found in stone.
- Easy color matching.
- Superior to liquid tints which frequently migrate out of repairs, especially where food and water are present.
- Never leaches out of repairs.
- Highly concentrated - a little tints a lot.
Intended Uses
- Countertop installation
- Cracks
- Gouges
- Pits
- Reattaching/rebuilding missing stone
Repair-Specific Instructions
Note: For more detailed instructions, please see the "Instructions for Use" module below.
- Chipped Stone: No tint is needed if you have a clean break. Apply the epoxy to one side & push the stone firmly into place. Clamp the stone or use duct tape for a tight hold while drying & for less visible seams.
- Countertop Installation: No joint line taping is needed as the dried epoxy does not stick to smooth surfaces. Mix equal parts resin & hardener & apply the epoxy to one or both edges of the stone. Clamp the stone for maximum bond strength. Let the epoxy cure & then razor off the excess in approximately 30 minutes once the epoxy is dry to the touch.
- Cracks: The width of the crack must be at least as wide as a credit card for the epoxy to be able to fill it. Tint the epoxy & fill the crack to the surface. Allow the epoxy to self-level for a glossy finish. For a matte or travertine type finish, razor the dried surface.
- Rebuilding Missing Chips: Tint & fill chip the with epoxy, shape the epoxy into place, let it dry, & razor off the excess.
Benefits & Features
- Can be used as an adhesive for countertop installation.
- Can be used with any natural or man-made stones (e.g., granite, marble, quartz, tile).
- Do-it-yourself (DIY) friendly with professional results.
- Fixes cracks & chips.
- Forgiving 15 minute workable time.
- Non-toxic/food-safe formula.
- Permanent bond.
- Quick 14-minute drying time.
- Quick-set epoxy.
- Tintable with EZ-Tint for easy color matching.
- Two part epoxy - resin & hardener.
Instructions for Use
Rebuilding Missing Chips
Note: Reattaching broken pieces rarely requires tinting unless some pieces are missing.
- Remove the protective film that forms over the hardener. Dip out equal amounts of resin & hardener using individual dipping sticks.
- Mix the resin & hardener together thoroughly on a flat surface (e.g., paper plate).
- If needed, add in small amounts of EZ-Tint to the mixed epoxy until the desired color is achieved.
- Fill the chip. Try not to overfill it.
- On profiled edges or vertical repairs, tape down the shaping strip over the epoxy.
- Allow 30 to 45 minutes for the epoxy to dry.
- Slowly peel back the shaping strip.
- Make sure the epoxy is dry to the touch & razor off the dried excess. The epoxy will not stick to smooth surfaces.
- Instant Install 29 will cure to a glossy finish. For a matte or travertine type finish, razor the dried surface.
Repairing Horizontal or Vertical Cracks
Note: The epoxy may need to be forced into finer cracks using a plastic putty knife.
- Remove the protective film that forms over the hardener. Dip out equal amounts of resin & hardener using individual dipping sticks.
- Mix the resin & hardener together thoroughly on a flat surface (e.g., paper plate).
- Add in small amounts of EZ-Tint to the mixed epoxy until the desired color is achieved. Use a plastic putty knife for large cracks. Try not to overfill the crack.
- On vertical cracks (e.g., walls), tape down the shaping strip over the epoxy. Using the shaping strip on flat or horizontal cracks is optional as the epoxy will self-level.
- Allow 30 to 45 minutes for the epoxy to dry.
- Slowly peel back the shaping strip.
- Make sure the epoxy is dry to the touch & razor off the dried excess. The epoxy will not stick to smooth surfaces.
- Instant Install 29 will cure to a glossy finish. For a matte or travertine type finish, razor the dried surface.
Countertop Installation
Note: No joint line taping is needed as the dried epoxy does not stick to smooth surfaces.
- Remove the protective film that forms over the hardener.
- Dip out equal amounts of resin & hardener using individual dipping sticks.
- Mix the resin & hardener together thoroughly on a flat surface (e.g., paper plate).
- If needed, add in small amounts of EZ-Tint to the mixed epoxy until the desired color is achieved. If the joint lines will be tight, tinting is not necessary.
- Apply epoxy to one or both edge(s).
- Clamp the stone tightly for maximum bond strength.
- Allow 30 to 45 minutes for the epoxy to dry.
- Make sure the epoxy is dry to the touch & razor off the dried excess. The epoxy will not stick to smooth surfaces.
- Instant Install 29 will cure to a glossy finish. For a matte or travertine type finish, razor the dried surface.
Mixing & Tinting Instructions
Step 1
Measure out & mix equal portions of resin & hardener.
Note: Tinting is optional. However, if the epoxy will be visible, tinting is required, as the tint masks any yellowing or other discoloration that may occur over time.
Step 2
Slowly add in tint to the mixed epoxy.
Note: If using white tint, use equal parts resin, hardener, & tint to prevent any future yellowing or discoloration. For darker colors, less tint is needed.
Step 3
Add tint until desired color is reached.
Note: Black or white tint can be added to darken or lighten the shade of the epoxy. As can be seen in the chip repair video on this product page, small specks of tint can also be added in after the epoxy is applied to your repair to create multiple colors & striations that are often found in stone.
Step 4
Razor away the dried excess epoxy. Razoring the cured surface will matte the finish if desired. If a glossy surface is desired, take care not to scrape the surface with the razor
Note: Your purchase includes a 2" x 4" clear shaping strip. Using the shaping strip is optional on flat surface repairs. On vertical surfaces, the shaping strip helps to keep the epoxy in place. On profiled edges like countertops, the shaping strip shapes the epoxy to the exact profile. Just use painter’s tape to tape the shaping strip down & keep it in place. In approximately 20 minutes, lift one edge of the shaping strip and ensure the epoxy is dry to the touch. Once the epoxy has dried, the shaping strip will not stick to it & peels away easily.
Similar suggestions by Bolo
More from this brand
Similar items from “Tile Epoxy Adhesives”
Share with
Or share with link
https://www.bolo.qa/products/UO0Q9CWFAJK